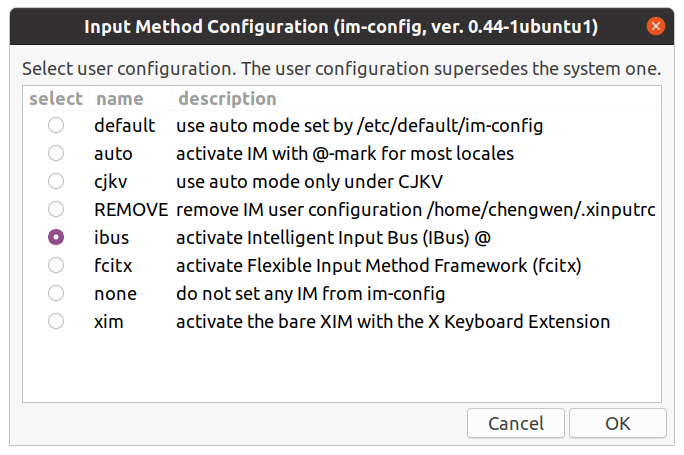
1. 前言 将Ubuntu 18.04 升级至 20.04 的版本之后,发现即使在安装了中文语言包的情况下也无法直接进行中文输入,升级前在18.04中安装的搜狗拼音在新系统中无法使用(很可能与搜狗拼音需要的Qt库有关,而20.04版本已默认不安装Qt库)。我长期以来使用的是 搜狗 的 双拼输入,而搜狗官方的Linux版本 尚未发布支持到20.04的版本(08-25-2020测试,发现已经有适配20.04的版本,见后文)。 经过自己的一些安装使用和体验,发现目前在20.04的系统中较为好用的中文输入方案有四种,下文将介绍安装和配置方法。 2. 准备工作 安装简体中文语言包(如已安装,请忽略) 安装 fcitx(这是由于百度、搜狗、Google拼音均通过fcitx——小企鹅输入法管理工具来配置),如果使用下文方案一可不用安装。 [03-30-2021 更新]: 在Ubuntu Wayland 桌面中使用fictx管理中文输入法 我给Ubuntu启用了Wayland桌面,发现安装的中文输入法不能使用了,在fictx的配置中无法添加进去。而在Gnome或其他桌面环境中不存在此问题。 2种解决办法: 登录时切换桌面,不使用wayland桌面,即可避免该问题; 如果继续使用wayland桌面,需修改配置文件。原因是wayland桌面默认不读取/etc/profile中的环境变量,而是从/etc/environment文件中读取,这是导致fcitx不能正常工作的原因。 sudo vi /etc/environment # Append the following content in this file INPUT_METHOD=fcitx GTK_IM_MODULE=fcitx QT_IM_MODULE=fcitx XMODIFIERS=@im=fcitx sudo reboot # 重启后发现输入法在fcitx中可见了,也能恢复正常使用了 3. 安装配置中文输入法 3.1 方案一:使用ibus添加中文输入法 其实 Ubuntu 20.04 是自带支持中文输入法的,只需稍作配置即可启用中文输入支持。 系统默认已有ibus,以下命令无需执行(因为我删除过) 采用下面命令选择输入法配置工具为ibus(如未配置过其他输入法,也是默认的) 最关键的步骤:在系统“设置”的“语言和区域选项”中添加输入源,通过添加Chinese(汉语)并点击,此时会出现系统自带的几种中文输入法。我选择的是第一个智能拼音方案(支持配置),主要是因为它支持双拼。 重启系统(不建议注销) 3.2 方案二:百度拼音Linux输入法 百度拼音输入法目前基于优麒麟(Ubuntu Kylin)系统进行发布,在优麒麟系统的软件商店中可以直接安装。尽管目前官方版本尚未正式发布支持Ubuntu 20.04的版本,但发现安装现有版本、完全可以正常使用。 官方下载:地址 安装方法: 下载后解压得到安装包文件、基于Deepin Linux和Ubuntu Linux的2份安装说明文档,可以先阅读一下文档。 进入解压缩目录进行安装: 我不想直接安装Qt(下载的包较多较大),所以我忽略了文档中安装步骤的前面5条命令。尽管这样安装会导致“输入法配置面板”无法打开(见文末的图示),但发现完全不影响正常输入的主要功能(输入偏好设置依然可用)。 说明:如参照我的方法调不出百度输入法,请参考官方文档进行安装。 配置方法: 运行命令 im-config 设定默认输入法配置工具为fcitx(参照方案一中图示 )。 运行命令fcitx-config-gtk3 使用fcitx配置工具添加百度输入法:选择左下角的“+”加号,输入 baidu 搜索已安装的 输入法(去掉那个勾),找到后点击添加并使用^移动到第一行(如果使用了多种输入法): 重启系统,发现百度拼音基本上等同(模仿)搜狗输入法,在输入时桌面右上角托盘区会有一只小企鹅图标(表示当前正使用fcitx在管理输入法),右下角有输入法状态条,可用来配置偏好。 3.3 方案三:搜狗拼音优麒麟社区版(企业定制版)(说明:建议使用搜狗官方新版本 08-25-2020) 使用搜狗官方提供的软件包进行安装存在依赖问题,网上也有人采取修复损坏依赖、进行强制安装(我未验证)。而优麒麟官网提供的搜狗输入法,我下载了64位安装包,虽然可以正常安装(会同时安装上搜狗五笔),但无法正常输入。经仔细查证,这两个版本都是在2019年发布的。最终我从Github了解到该输入法的优麒麟系统社区版打包,这是搜狗输入法目前全网最新的Linux修改版,其打包上传到优麒麟的仓库时间是今年4月28日,这个修改定制版是我目前找到的、在Ubuntu 20.04上唯一可正常安装和使用的版本。 说明:采取下面的方法进行安装不会存在依赖问题,且能够正常使用。 添加优麒麟仓库源进行安装 注意:下面install的是sogouimebs包 采用fcitx-config-gtk3搜索sogouimebs将搜狗输入法添加进去,在输入时可看到熟悉的状态条,下图是输入法的属性配置。 在18.04的版本中使用搜狗拼音时,为防止ibus与fcitx相冲突,需执行下述指令移除ibus包。 但是经自己测试:在20.04的版本上下述指令没有必要。 2020-03-302020-08-25 更新搜狗输入法(个人版)** 此文写于数月2个月之前,今天看了一下搜狗输入法官网,发现目前搜狗已经完美适配Ubuntu 20.04,建议采用官方软件包进行安装。下载deb包后,先卸载之前安装的搜狗企业版,然后再安装官网新版本v2.3.2 2.4.0。重新看了下百度Linux输入法,官方的更新依然停留在2020年,也未针对Ubuntu 20+ 以后的版本进行更新。从这一点看来,搜狗拼音在Linux上的开发升级还是非常重视和及时的,这也我多年坚持选择使用它的原因。 最近一次升级是在 2020-11-16,在Ubuntu 21.04 和 21.10出来之后,如果兼容有问题,我判断搜狗应该会继续更新。 新版本也没有我之前使用过程中的一些问题,也可以选择配置皮肤,字体大小等。 3.4 方案四:Google拼音(2020-06-29增加) Google拼音已经发布支持Ubuntu 20.04的版本,所以,我也打算试试它。同样,Google拼音也需要通过fcitx小企业输入法管理器来配置(前文已安装)。 安装: 重启后发现新安装的Google Pinyin已经自动添加到小企鹅输入法管理器之中。 但发现:在Ubuntu中该输入法只能输入全拼或简拼,不能配置支持双拼,默认为中文输入,需按CTRL + SPACE才可切换中英文(不能按Shift键),暂时没找到可配之处。 4. 方案比较(以支持双拼的为主) 由于Google拼音在Ubuntu之下不支持双拼,所以暂时未加入下面列表作比较,如习惯使用全拼、简拼,也可考虑谷歌拼音输入法。 输入法 UI体验 安装配置难度 功能性能 Bug状况 ibus智能拼音 简单,可配置偏好;无皮肤 容易,系统默认支持 输入偶尔有延迟、支持词库 稳定性、兼容性最好 百度拼音 简洁,可配置偏好和皮肤(如安装) 一般,需先安装fcitx 最流畅、支持联想输入、用户词库等 安装皮肤后(不建议安装)输入会出现乱码 搜狗优麒麟企业版 更多可配项:输入偏好、皮肤(没有好看的);高分屏下默认状态条太小(可配) 一般,需先安装fcitx 支持联想输入、用户词库、功能完整 双拼方案尽管可选择采用自然码,但实际上依然是其他方案 5. 结论 尽管以上几种输入法的UI均不如Windows下的版本完整漂亮,但在一个崇尚简洁的Unbutu系统里,它们各有千秋、难分伯仲,均可满足中文输入的需求。从支持双拼的前面几款输入法来看: 如果你追求稳定、易于配置,使用系统自带的输入法即可; 如果你追求流畅,希望输入时更加高效(速度+更准确的智能联想),可选择百度拼音; 如果你追求经典,更多的偏好配置,那么可以继续选择搜狗拼音; 你也可以让百度拼音和搜狗拼音同时安装存在于系统之中,通过fcitx配置好快捷键进行切换。 说明:上图中的最后一个配置项是用来配置百度拼音输入状态条皮肤颜色的,如果在方案二按照上文方式进行安装,将无法启用该配置项(用处极小、完全可不用)。如要启用皮肤,执行: 注意:安装这个皮肤会导致搜狗拼音被删除(两者冲突),并在使用百度拼音时突然出现乱码。因此,不建议安装此状态条皮肤。

Ubuntu 20.04 LTS (Focal Fossa) was officially released on April 23 after two years since the release date of version 18.04. Ubuntu 20.04 features the latest LTS kernel 5.4 and it supports ExFAT file system by default so I can explore files in my Windows system wihtout any barries. It bring many other new features and higher performance as well compared to 18.04. Commands to upgrade from Ubuntu 18.04 $ sudo apt update && sudo atp upgrade -y $ sudo systemctl reboot # Login Loop issue may occur after reboot $ sudo apt dist-upgrade $ sudo apt autoremove $ sudo apt install update-manager-core -y $ sudo do-release-upgrade $ cat /etc/lsb-release DISTRIB_ID=Ubuntu DISTRIB_RELEASE=20.04 DISTRIB_CODENAME=focal DISTRIB_DESCRIPTION="Ubuntu 20.04 LTS" Issues during upgrading process Login Loop Issue: I cannot login system with a valid password after the first reboot: I googled and refered some online solutions like chown username: username .Xauthority, change grub file, etc., these ways cannot fix my issue: I cannot find an .Xauthority file in my home directory (the reason may be my computer is a dual-system) Other issues will occur after trying them The solution is: Press ALT + F3 to switch to another terminal, and excute the upgrade commands once again(without running the reboot command) and continue the upgrading process. The upgrade can be done in this terminal, and the issue will be fixed automatically once Ubuntu 20.04 is installed. It Upgraded to Ubuntu 19.10 at first, not 20.04 directly. I don't actually know the reason, solution: Repeat the upgrade commands to upgrade from 19.10 to the latest 20.04…

The easiest and fastest way to migrate wordpress blog with LetsEncrypt SSL certificate to GCP
Estimated Time 30 minutes - one hour if: be confortable with command line and GCP console everything goes smoothly Tools Wordpress plugin: UpdraftPlus Docker and docker compose Git Steps Part 1: Backup data on the original blog machine Login to wordpress blog admin page and install UpdraftPlus plugin; Use UpdraftPlus to backup all the data of wordpress blog, then download to local drive(coz I don't use the cloud drive); Part 2: Create and setup a GCP VM instance Login to the GCP web console Create a VM instance, set it to allow HTTP/HTTPS traffic, use static IP address; Copy computer's SSH public key content in file ~/.ssh/id_rsa.pub (generated by command ssh-keygen), add it to VM instance SSH Keys; Use ssh -i ~/.ssh/id_rsa username@vm_static_ip to login to the GCP VM instance(or via the web console's SSH Connect feature open in a browser window); Install and configure git, docker, docker compose; Part 3: Update domain IP mapping from DNS provider(mine is GoDaddy) Change the domain type A value to GCP instance static IP from the DNS provider website; Part 4: Install LEMP stack and WordPress then restore on GCP VM instance git clone https://github.com/mjstealey/wordpress-nginx-docker to gcp instance. Read the document to get a general idea of the customized lemp containers before doing the following; Edit the Dockerfile docker-compose.yml to setup mysql and wordpress user/password: cp .env_example .env vim docker-compose.yml Use the shortcut way to install LEMP stack with wordpress package: sudo -i docker-compose up -d # run it in the cloned repository's root directory Open http://vm-instance-static-ip in the browser to setup and…
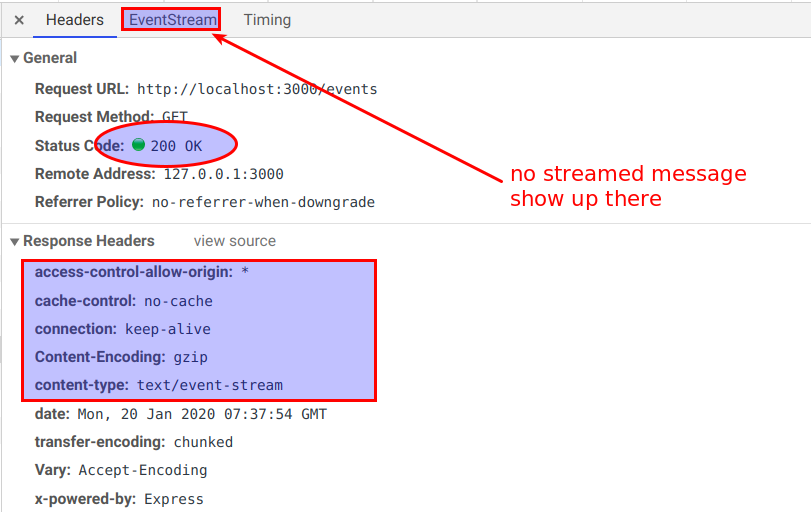
Issue and phenomenon When I use server sent events to the react client: the event messages can be received when I access the backend by request url directly from the browser address bar, but can never be received by the front end application, and the EventStream in Chrome Dev-Tool is empty; However, once I stop the backend server, ALL the messages are flushed/sent to the client at one time. It seems that the messageS are buffered or pended somewhere. The node.js/express test code: The client javascript: Analysis I have already enabled CORS by using cors middleware at the backend; The proxy works fine, as the other requests to the endpoints are avalaible; The Cache Control option settings of the response HTTP header of server-side are exactly the same with the sample code of MDN docs and it looks right. I didn't get an answer from others or google sse, eventSource, cors or proxy. One suggested way is to disable CORS of browser: $ google-chrome --disable-web-security But I don't think this is a good way as we need to put things online eventually, it didn't work for debugging as well when I tried. Solutions This bugged me serveral hours. I luckily found two solutions by changing code line by line: Use full URL to request the events (may not be decent, but it works) from client side: const sse = new EventSource('http://localhost:8080/events'); Set the server-side Cache Control Header to no-transform: 'Cache-Control': 'no-cache', --> 'Cache-Control': 'no-transform', or 'Cache-Control': 'no-cache', --> 'Cache-Control': 'no-cache, no-transform', I cannot fully understand why the no-transform directive matters…

Intro My computer is Lenovo T460p, upgraded after I bought in 2017: 480G SSD(Q200 Ex) : replaced the original HHD 24G RAM(8G+16G): increased a 16Gb Samsung RAM It came along with an installed Windows 10 which I updated to version 1903 recently. A course I want to take doesn't support a machine with Windows friendly, it suggests a Ubuntu or Mac. While we strongly recommend using an Apple Macbook for your laptop, we also understand that it's not exactly the most economical option. If you already own a Windows laptop, then you are expected to install and use Linux either alongside (dual boot) or instead of Windows. Ubuntu is our suggested vendor, but Mint is also a fair option. However, I am not willing to install dual-boot systems or replace the already installed Windows 10, as my internal SSD is full of data, it's also not easy to find an economical M.2 2242 type SSD which can be extended on board as a second hard drive. They suggest install Ubuntu on an external drive as an alternative option. It's a economic solution indeed after I found this SSD ( sale price: $99.99 at Best Buy/Amazon on Sept. 12th): Samsung T5 500GB USB External Solid State Drive (MU-PA500B/AM) Preparation A 32 GB USB stick/flash drive (more than 4G is acceptable) Utility: Rufus.exe 3.7 Portable Ubuntu 18.04 Desktop Image Samsung T5 500G SSD with USB cable Steps 1. Create a Ubuntu bootable USB stick Win 10 is both compatible with UEFI and legacy BIOS boot mode. Run command msinfo32 to check boot…
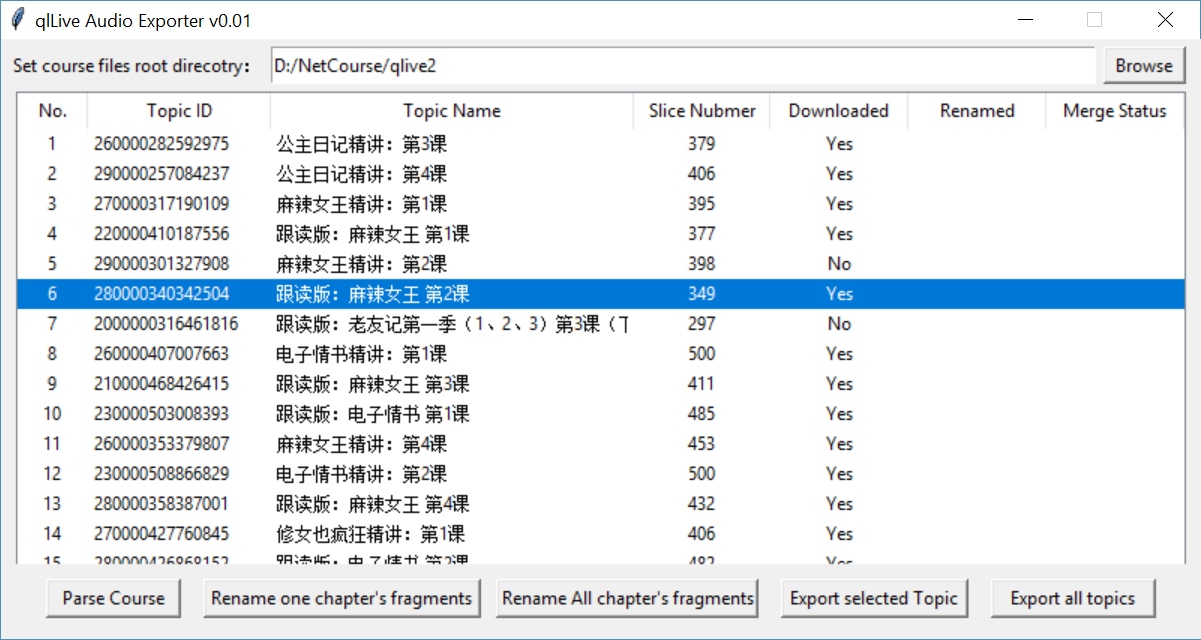
Build an audio fragments merger for qlive App courses, use python tkinter to create a window program.
Win10+Python3.6 Install ipython and juypter(notebook) > python -m pip install --upgrade pip > pip install ipython jupyter Run ipython > ipython Run ipython with qt gui > pip install pyqt5 > ipython --gui=qt Run jupyter notebook > jupyter notebook then, create your notes in the web notebook in browser

VoIP:Asterisk/Freepbx-No audio for established sip calls and call drops after 30 seconds 两条命令解决Asterisk通话无声音、30秒自动挂断的问题
Open firewall ports for RTP to fix asterisk dumb and auto-dropped calls issue 防火墙开放端口放行RRP报文,两条命令解决Asterisk通话无声音、30秒自动挂断的问题。

01、为什么叫Shell? Command Interpreter,交互的命令解释器,它是相对于kernel的说法,是kernel的外壳程序,用来实现用户与kernel的命令行沟通:将用户的命令翻译给内核处理,同时将内核的处理结果反馈给用户。 系统登陆时取得的shell称之为login shell或primary shell。 在shell中所下达的命令,都是shell所fork出产生的子进程。 在shell中执行的脚本,则是另外由一个单独的非交互的sub-shell取执行,然后在由sub shell执行script中的各命令(也会产生相应的进程) Linux OS支持多种shell,具体在/etc/shells中可以看到,主要分为sh(如sh、bash)和csh(csh、tcsh、ksh)两大类。 02、Shell prompt(PS1)与Carrige Return(CR)的关系 PS1是用来告诉用户可以输入了,通常有两种形式: $:给普通用户使用 #:超级用户使用 CR由Enter回车键产生,是让用户告诉shell,我的命令输入完成,shell可以去解释和执行了。 命令行的定义:位于shell prompt和CR字符之间用户输入的文字。 一个标准的命令行由三部分组成,其中后面两个部分是可选的。 command-name options arguments 重要原理 Shell会根据IFS(Internal Field Separator)将命令行拆解为字段(word),然后再处理各字段中的特殊字符(meta),最后再重组命令行。 常见的IFS有:空格键、制表符、回车键等。 命令的名字可以来源于: Shell内建命令 $PATH之下的外部命令 命令别名 指定路径的其他外部命令或脚本 03、echo命令 echo的作用:将其argument送至标准输出。默认在显示完输入参数之后,再补充送出一个换行符(new-line character)。如要取消该换行符,采用echo -n arguments即可。 所以,直接输入一个不带任何选项和参数的echo命令,将输出一个空白行(就是new-line character)。 $echo $ 而输入echo -n相当于完成echo输入,再回车到另一行,echo执行将无任何输出。 $echo -n $ echo命令的三个选项: -e:启用对反斜杠转义字符的识别 -E:关闭反斜杠转义字符(默认为关闭) -n:取消行尾的换行符 所以echo常用来检查变量值 04、引用和meta处理(单引号、双引号、反斜杠) 4.1 Shell中的字符类型 命令行中的每一个字符,要么是literal character,要么是meta character。前者就是普通字符,后面是具有特别功能和意义的特殊字符(保留字符)。例如,IFS和CR都是meta。其他常用的meta还有: =:设置变量 $:用来对变量或运算进行替换 >:重定向stdout <:重定向stdin |:管道 &:重定向文件描述符,或将命令置于后台运行 ():将内部的命令置于nested-subshell中运行,或用于整数运算、命令替换。 {}:将内部的命令置于non-named function中运行,或用于变量替换的边界范围界定。 ;:执行前一个命令结束后,不判断返回值,继续执行分号后的下一个命令。 &&:判断前一个命令返回值是否为true,如实则继续执行下一命令。 ||:判断前一个命令返回值是否为false,如实则继续执行下一命令。 !:执行history中的命令。 其他…… 这些特殊字符由于具有特别的含义和功能,如不该出现的时候却使用了会导致命令出错或者达不到预期的效果。因此,在大部分情况下,我们根据需要会选择性的通过quoting来关闭这些meta。 escape:逃脱符。仅关闭其后紧接的单一meta。 soft quote:双引号。部分关闭内部的meta,如$、``和\这三种则不被关闭。 hard quote:单引号。全部关闭内部的meta字符。 空格键在单引号和双引号内均会被关闭 单引号、双引号在soft quote和hard quote中均被关闭 ENTER键在这三种引用内均被关闭,视为换行符,但是在命令重组阶段分别被视作换行符、空格符或无字符。 4.2 区分shell meta和command meta $awk {print $0} 1.txt #语法错误:{}在命令行中被视作命令块用,而括号中的命令又没加上;分号 $awk '{print $0}' 1.txt #OK:用''关闭所有大括号meta,使其成为awk的参数,避免在shell中处理 $awk "{print \$0}" 1.txt #OK:由于$在""未被关闭,所以需加用\来关闭 $awk \{print\ \$0\} 1.txt #OK:没有使用''和"",全部使用\来关闭shell meta $awk "{print $0}" 1.txt #语法不报错:""不能关闭$,所以$0还是shell变量,$0不能成为awk的Field Number。因为此处不是在执行脚本,所以$0也没有意义,被当作0处理,因此逐行打印0。 $awk "{print $1}" 1.txt #语法不报错:""不能关闭$,所以$0还是shell变量,$0不能成为awk的Field Number。因为此处不是在执行的脚本内部,所以$1也没有意义,被视为空值。 $awk "{print $10}" 1.txt #语法不报错:""不能关闭$,所以$0还是shell变量,$0不能成为awk的Field Number。因为此处不是在执行的脚本内部,所以$1也没有意义,被视为空值。因为位置参数最大是$9,又没有采用边界界定符,所有$10被视作$1和0,而$1被无视,所以等价于逐行打印0。 上述第一行,由于{}在shell中是用来将其中的命令组合起来成为一个命令块,那么{print $0}被视作为一命令块,其语法要求最后一个命令后面要用分号。所以上述写法会报语法错误! 上述第二行,用hard quote关闭了{}的命令块功能,同时也关闭了空格和\$0在shell中的meta作用,从而不被Shell作为Shell meta先解析,使得这几个meta成为命令awk自身的command meta($0是awk的field number,表示整行内容),而作为命令行参数的内容去解析。 使用第三行和第四行也同样达到取消{}、空格和$作为shell command的效果。其他: 发现在shell中任意命令(非执行script)末尾输入\$1-\$9,\$1-\$9会被无视、语法不报错。 在shell中任意命令(非执行script)末尾输入\$0,结果有所不同、语法不报错。 假设awk使用的$x的值从shell中获取进来,可采用变量替换来做(不要直接用hard quote,因为hard quote关闭了所有shell meta,无法直接进行变量替换),采用下述方法: $A=0 $awk "{print \$$A}" 1.txt $awk \{print\ \$$A\} 1.txt $awk '{print $'$A'}' 1.txt $awk '{print $'"$A"'}' 1.txt 05、变量与export 5.1. 定义变量(set,=) 设定变量采用 变量名=变量值 的格式,注意: =前后不能有IFS,=后面可以为null 变量名是 Case Sensitive(大小写敏感的) 变量名避免使用meta、$ 变量名第一个字符不能是数字 变量名长度限制在256个字符 首次set变量可以理解为定义变量并对其赋值 之后每次对变量名执行=,相当于对变量重新赋值 已经赋值的变量已存在,这对变量做进阶处理时${var}有影响 5.2. 替换变量(符号$) Shell强大的原因就是因为在命令行中其支持替换(变量替换、命令替换),变量替换的格式: $符号加上变量名,如$A,A必须已定义。 注意: 变量替换是指用变量的值来替换$变量名,将其再放置到command line之中; 不要用数学逻辑来套用变量设定,变量的值只看变量每次被set时=后面的值,与其他无动态关联关系,如: A=B B=C 这里,A的值不会变成C A=B B=$A A=C 这里,A的值最终为C,B是一个变量,值为C,也不会让B的值等于C 利用命令行的变量替换和区隔符号:可以append变量的值: A=B:C:D A=$A:E 而不能采用: A=BCD #A的值D A=$AE #此处,AE被视作一个变量,而不是先$A,再扩充E。若AE未定义,那么$AE为空,使得A为空值。 而应采用: A=BCD A=${A}E #使用{}限定变量名的范围,A变为BCDE 注:${}有很多用法 5.3. 设定环境变量(export) 环境变量即为全局起作用的变量,在shell上定义的变量均属于local variable,只有通过export输出之后才能成为环境变量,供后续其他命令使用。但是也仅仅是对当前Shell的session起作用。语法: A=B #先定义 export A #变量A不需要带$,或者直接 export A=B 例如,下面使用了$A,会进行变量替换 A=B B=C export $A #$A替换为B,那么等价于export B,是将变量B输出为环境变量 另外,直接使用export命令可以查看已经设定的环境变量 export export环境变量的生存期: 在shell中export的环境变量仅对当前shell的session起作用(写在内存中),shell退出后不再起作用 source(点命令)配置文件可以使得配置文件中的设定在当前shell中立即生效(当前不用重启) 如要使得变量任何时候对各session均有效的环境变量,需将其写入/etc/profile(全部用户)或者.bashrc(当前用户)等配置文件中(source或重启之后永久生效) 5.4. 取消变量(unset) 取消变量等价于删除变量,该变量将未定义、不存在。但以下在shell中输出均一样。 $ A= $ echo $A $ $ unset A $ echo $A # $ 但是null value的变量和unset的变量在变量的进阶处理${var}中有很大的区别,例如 $ str= #null value $ var=${str=expr} #变量str已set为null,str在此不再被set赋值,set不执行 $ echo $var $ $ echo $str…

command substitution, Bash Shell command process flow, soft quotation。命令替换、双引号引用,Bash命令行执行流程