
I created two websites and deployed them on a free-tier AWS EC2 instance, they have been runing normally since this March; however, it is not available to access today. Updates on 30th Sept.: This happens every two weeks or every month since the first time in this July. Issues I cannot visit my sites from my devices and other peoples', they response is timeout; I cannot connect to the ec2 instance via ssh with my own perm as usual, and it says: ssh: connect to host ec2-54-188-32-115.us-west-2.compute.amazonaws.com port 22: Connection timed out The EC2 IP address is not pingable. Troubleshooting So I opened the EC2 web console and found that my instance is running, but there is a yellow warning sign from the dashboard as only "1/2 checks passed" of the Status Check. The Status Checks failed at the second stage: Instance reachability check failed, and it failed 13 hours ago. The help info suggests a reboot to recover or create a new instance. The latter suggestion is a obviously awful solution as I will lost all the data and configuration. The AWS kownledge center list many reasons or solutions for this issue, and I don't want to read that much before I've tried some easist way. First try: reboot. I reboot it from the console twice, however, the instance cannot be recovered, and the yellow warning still exists. Second try(Fix): Stop and start separately. This is not listed from their suggestion. I certainly don't want to create a new instance. So I stopped the instance from the console, and…

Sass: Syntactically Awesome Style Sheets is the most mature, stable, and powerful professional grade CSS extension language in the world. 1. Steps to use sass in Native html Install sass globally by npm Create separate folders to put .scss and .css files Watch .scss files and compile them to .css real-time Monitor and sync compile single .scss file Monitor and sync compile .scss file to .css in its own directory Or use an extention in VsCode to compile: live-sass-compiler: Compile Sass or Scss to CSS at realtime with live browser reload. easy-sass: Built-in, easy to use Sass compiler Link the .css file in the header of html document: 2. Steps to use sass in React Install node-sass as dependency for React Change file extension .css to .scss Import the .scss files in React component: or read the React official tutorial here 3. Steps to use sass in Vue.js Install npm packages as development dependency: or setup to use them when creating Vue app via vue-cli scaffold tool. You can pick a preset manually and choose a CSS Preprocessor tool while running the vue-cli scalffold. If you choose SASS/SCSS, node-sass and sass-loader will be installed automatically when the project is created. Add lang="scss" in the style tag of the Vue component:
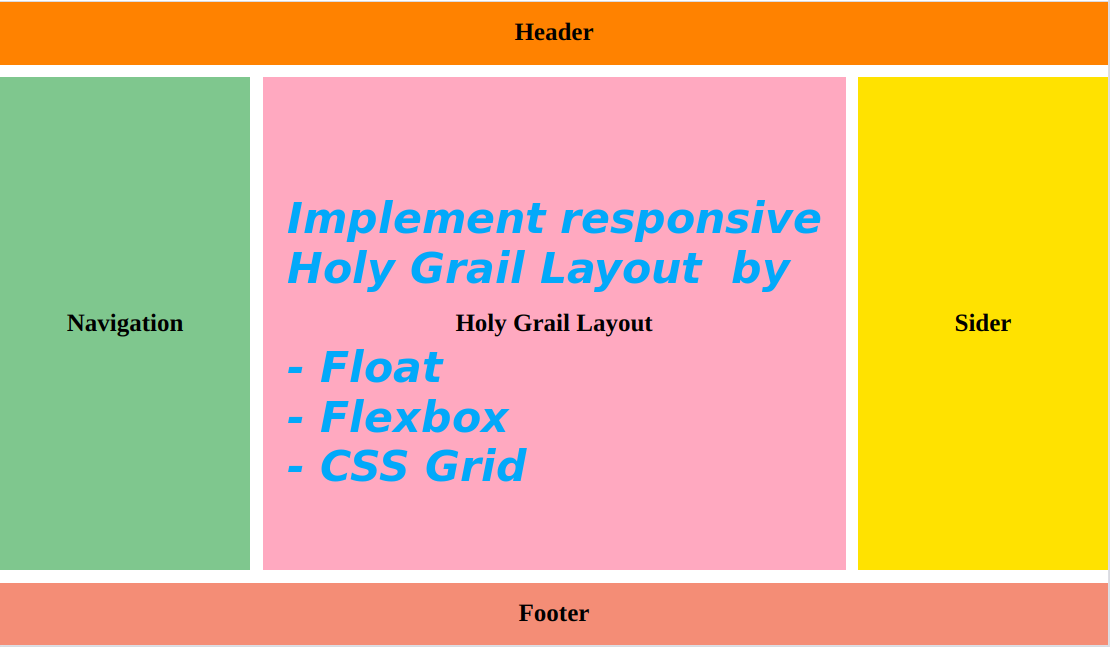
Holy Grail Layout is a classical three-column layout, I will implement it here via three methods: use traditional CSS float property, flexbox and CSS grid separately. The main parts of holy grail layout above should have: height of header and footer: 50px width of two sider columns: 200px responsive height of the three columns, width of the main content Use float property to layout the middle three columns CSS Code Markup Code Use flexbox CSS Code Markup Code: The same with using float Use CSS grid CSS Code Markup Code Comparision float: It is a little complex, and needs to clear the float property from the parent box flexbox: Really flexible, less code, easy to achieve from one dimension - by rows in this case css grid: A two-dimension way to layout, we need to have a good division of the boxes
The easiest and fastest way to migrate wordpress blog with LetsEncrypt SSL certificate to GCP
Estimated Time 30 minutes - one hour if: be confortable with command line and GCP console everything goes smoothly Tools Wordpress plugin: UpdraftPlus Docker and docker compose Git Steps Part 1: Backup data on the original blog machine Login to wordpress blog admin page and install UpdraftPlus plugin; Use UpdraftPlus to backup all the data of wordpress blog, then download to local drive(coz I don't use the cloud drive); Part 2: Create and setup a GCP VM instance Login to the GCP web console Create a VM instance, set it to allow HTTP/HTTPS traffic, use static IP address; Copy computer's SSH public key content in file ~/.ssh/id_rsa.pub (generated by command ssh-keygen), add it to VM instance SSH Keys; Use ssh -i ~/.ssh/id_rsa username@vm_static_ip to login to the GCP VM instance(or via the web console's SSH Connect feature open in a browser window); Install and configure git, docker, docker compose; Part 3: Update domain IP mapping from DNS provider(mine is GoDaddy) Change the domain type A value to GCP instance static IP from the DNS provider website; Part 4: Install LEMP stack and WordPress then restore on GCP VM instance git clone https://github.com/mjstealey/wordpress-nginx-docker to gcp instance. Read the document to get a general idea of the customized lemp containers before doing the following; Edit the Dockerfile docker-compose.yml to setup mysql and wordpress user/password: cp .env_example .env vim docker-compose.yml Use the shortcut way to install LEMP stack with wordpress package: sudo -i docker-compose up -d # run it in the cloned repository's root directory Open http://vm-instance-static-ip in the browser to setup and…

execute sql sentences to update table in wordpress database to recover blog views and likes reset by uninstall WP-Postviews plugin. 通过在MariaDB中执行SQL语句修改Wordpress数据表来恢复丢失的日志访问信息(阅读数量和点赞次数)。

闲来无事,看了下访问本主机的日志信息,结果不看不知道,一看虽没吓一跳,但至少没让我意外。好家伙,这么多记录,先来看看他们的行为: #cat /var/log/secure | grep Failed |wc -l 3393 一共发现接近3400条登陆失败的记录!!不到一天时间,不少了吧? #cat /var/log/secure | head -n 100 | grep Failed Mar 12 04:22:46 sshd[21607]: Failed password for invalid user 1 from 212.15.99.53 port 45244 ssh2 Mar 12 04:26:06 sshd[21637]: Failed password for invalid user 2 from 212.15.99.53 port 41958 ssh2 Mar 12 04:29:23 sshd[21659]: Failed password for invalid user 3 from 212.15.99.53 port 38680 ssh2 Mar 12 04:32:35 sshd[21685]: Failed password for invalid user teamspeak from 212.15.99.53 port 35402 ssh2 Mar 12 04:35:50 sshd[21713]: Failed password for invalid user teamspeak from 212.15.99.53 port 60350 ssh2 Mar 12 04:39:10 sshd[21739]: Failed password for invalid user teamspeak from 212.15.99.53 port 57078 ssh2 Mar 12 04:42:37 sshd[21774]: Failed password for invalid user teamspeak from 212.15.99.53 port 53790 ssh2 Mar 12 04:43:34 sshd[21788]: Failed password for root from 5.188.203.113 port 7002 ssh2 Mar 12 04:43:39 sshd[21791]: Failed password for invalid user mcserver from 5.101.0.51 port 57443 ssh2 Mar 12 04:45:59 sshd[21809]: Failed password for invalid user teamspeak from 212.15.99.53 port 50510 ssh2 …… 212.15.99.53这个家伙从今天凌晨三点开始,几乎没有间断过采取不同的用户名和密码尝试登陆我的主机。 从日志记录信息不难看出,所有尝试登陆Failed记录的最后三个字串是port 端口号 ssh2这个形式,利用这个特性非常方便提取入侵者的IP。通过强大的awk命令即可列出所有入侵者登陆失败的IP地址: #cat /var/log/secure|awk '/Failed/{print $(NF-3)}' 将提取出来的IP结合sort命令进行排序,就可将同一IP的尝试记录排列放在一起。输出放至ip1.tmp文件中: #cat /var/log/secure|awk '/Failed/{print $(NF-3)}'|sort > ip1.tmp 结合uniq -c命令的重行计数功能,删除ip1.tmp文件中接连相同的重复行。我用awk将其格式化成IP tried times: count的形式输出至ip2.tmp文件中: #cat ip1.tmp | uniq -c|awk '{print $2 "\t" "tried times: "$1;}' > ip2.tmp 再用sort做一次按照入侵失败次数从多到少的排序,排序结果输出至hacker.iplist文件之中: #sort -nrk 2 -t: ip2.tmp > hacker.iplist 删除两个临时文件: #rm -f *.tmp 现在看一下hacker.iplist文件中统计出来的ssh非法访问数据: 数据1:有多少IP尝试通过ssh非法登陆本机,但失败了?数据是:70个 #cat hacker.iplist | wc -l 70 数据2:尝试次数top 10。 114.32.120.181这个IP尝试了1400多次!! #head hacker.iplist 114.32.120.181 tried times: 1462 218.65.30.53 tried times: 840 145.249.106.78 tried times: 424 5.135.167.146 tried times: 308 212.15.99.53 tried times: 49 173.249.15.111 tried times: 45 103.99.0.205 tried times: 30 5.188.10.156 tried times: 24 188.166.218.235 tried…