I think WPS office suite is a better option than LibreOffice on Linux OS, especially it is more compatible with MS Office. Uninstall LibreOffice suite Remvoe LibreOffice by apt-get remove in one command line instead of apt remove, as the latter doesn't support wildcard. Remove installation packages no longer needed Install WPS 2019 from official website Go to WPS website, click and download the *.deb package. The package version is 11.1.0.9522 and released on 2020.06.08. Go to the download folder and install, then delete the installation package. To launch the WPS writer, just type: You will see a very clean application, however it has no internet connection for online service. Install WPS 2019 by snap package Alternatively, you can install the snap package because WPS has already launched in Ubuntu Software Center. Search wps and find to install, or install it with the following commands. Update repositories and look up available packages There are several versions in the list, and wps-2019-snap is the latest one, while wps-office-multilang is actually WPS 2016 which is not recommended right now. Install the latest version 11.2.0.9505 (which is not as updated as the package from official site). Suggestion I suggest download WPS from official website and install it from your local drive. It's more fast than installing from the snap archive servers, and you will get a more updated version as well.
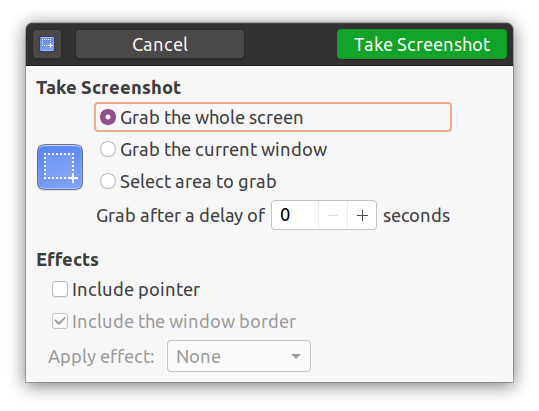
一、前言 本文不对每款软件的具体使用做详细介绍,如不熟悉可以自行操作几次即可(欢迎留言)。 本文倾向于介绍主要截图软件的选择(差异和优缺点)、核心用法、遇到问题的解决办法、不足之处的弥补、以及大家平时可能没有留意到的一些技巧。以便大家根据具体的应用场景,让你的截图需求能得以尽可能满足。 本文的目的是让你在 Ubuntu 20.04 下选择和使用截图软件时,完全不需再去寻找其他软件和遇到问题的解决办法,而通过看这一篇文章即可全部搞定。篇幅偏长、文字较多,建议耐心翻阅。 二、几个问题 是否有Windows的Snipaste这样的截图神器? 答案是目前还没有,但有类似软件flameshot。 flameshot可以出色的完成Snipaste的功能吗? 答案是基本可以,但部分功能尚不完美。 那怎么弥补? 请看下文 三、Ubuntu截图三叉戟介绍 gnome-screenshot与生俱来,另两款(flamehsot和shutter)功能强大、各有千秋,有了他们仨,真的没必要再去寻找其他替代方案了。 1. gnome-screenshot GNOME桌面系统中原生截图工具,系统中默认的几个截图快捷键(可修改,但不可直接删除)均是调用的是该程序。 自述:其实我也是带UI的,只是一般情况用快捷键执行我的功能就好了。想看我的容貌? 截图默认保存路径:用户根目录/Pictures 建议记住如下六个快捷键(尤其前几个): 快捷键 功能描述 Print 全屏截取并保存 Shift + Print 选区截取并保存 Alt + Print 截取当前活动窗口并保存 Ctrl + Print 拷贝全内容至剪切板(不保存文件) Ctrl + Shift + Print 拷贝选区内容至剪切板(不保存文件) Ctrl + Alt + Print 拷贝当前活动窗口至剪切板(不保存文件) 优点:原生自带、随手可用 缺点: 不带图片编辑功能 选区截图需 Shift 和 Print 两个同时按住、另需鼠标划定范围,因此必须双手操作。由于选择区域时通常较为仔细、操作时间更久,导致按住两个键的一手负担偏重 主要问题及解决办法:因为系统默认保存路径这个目录自动关联了很多其他程序与图片相关的操作,导致保存的图片来源众多、不便区分查找。如何将截图文件保存到自定义的目录?默认保存路径在系统中只能通过修改dconf数据库中的键值(通过dconf editor)修改,但即使修改了、在使用快捷键截图时却依然不生效。这是GNOME中一个多年未解决的缺陷,在采用Gnome 3.8.x以后版本的桌面系统中怎么修改都不会生效,除非不用系统默认快捷键。这个问题提出已有7年时间,但官方尚未决定去修正(我估计是因为可以通过别的方法即可达到该目的)。解决思路是:在修改了保存路径之后,禁用系统已定义的快捷键(或直接定义其他不同的快捷键调用gnome-screenshot来截图)、然后重新自定义相同的键映射。为了让截图底快捷键与上表中的保持一致,我使用如下方法来解决该问题(限于篇幅,不再介绍如何使用dconf editor等工具来修改): 第一步:创建目标目录,并修改gnome-screenshot的保存路径至该目录 第二步:禁用系统截屏快捷键(以上表中的6个键为例) 第三步:调用gnome-screenshot命令重新映射这6个系统截屏快捷键(这一步建议在Gnome Control Center中手动配置,各快捷键分别调用的命令如下): 想了解如何自定义快捷键,请阅读该文,如想批量修改自定义快捷键,请阅读该文。 2. shutter 功能完善、自带图片编辑器。我在 Ubuntu 18.04 版本中的截图和编辑工作基本上由它完成。 安装:Ubuntu 20.04 官方源提供的 snap 版本可以安装,但运行时存在缺陷,发现如下问题: Error while opening directory /home/username/Pictures There was an error determining the filename ... 截取窗口时程序崩溃却未退出,因此再次启动程序导致部分功能依然不能使用,需先杀死进程 解决办法:不要使用官方snap包(软件中心)进行安装,添加下面的PPA源安装(定制修正版)即可(此版本暂不能截取网页,但其他功能稳定) 优点: 提供了单独的图片编辑器,可在截图后对图片进行编辑,便于后期制作图文教程(例如针对描述操作步骤,该版本提供了自增的文字序号,非常方便) 可用鼠标自由截取选区 可截取当前活动的窗口、非活动窗口、菜单和提示框等 系统托盘区图标弹出菜单分类清晰,非常便于按需截取(因此没必要去定义快捷键) 缺点: 不能在截取时直接编辑(这也算不上缺点,这是相对于flameshot或snipaste来说的,但也是设计理念的差异) 截取窗口时有小部分的边框背景出现(若该窗口非全屏或背景有其他颜色,导致截图看起来不完美) 技巧: 在打开了截图文件后,可用Shutter的编辑器进行图片编辑。快捷键:Ctrl + E 3. flameshot 最接近 Windows 下的 Snipaste 的软件,一看截图界面你就会喜欢它的。 安装: 优点: 在截取时即可进行图片编辑(与snipaste类似),节省操作时间。对于做演示建议多使用它。 可用鼠标自由截取选区 缺点: 不能在截取时直接编辑(这也算不上缺点,这是相对于flameshot或snipaste来说的,但也是设计理念的差异) 不可直接截取活动窗口 编辑功能有待加强(相对于Snipaste): 插入文字默认字体太小(文字输入字体太小,虽然可以调节,但文字调大后,画图工具的笔刷又太粗) 已编辑对象不可再次编辑(可取消,但不可移动调节大小,修改文字内容等) 技巧: 配置支持在图片上添加文本(可能是因为这块功能尚不完善,所以默认未启用) 配置支持截图附着在桌面上(默认未启用,做演示时非常有用) 为区域选择和延迟截屏定义快捷键(参照下面的第四部分) 在画图和添加文字时为画笔或文字选择不同的颜色,快捷键:右键 调出下图中间圆形区域,提供10种可选颜色: 编辑时打开侧边栏画板用来调节画笔粗细、文字大小、编辑历史。快捷键:空格 将在屏幕左侧打开侧边栏,可以调节编辑颜色、画笔文字粗细,查看编辑历史。虽然该功能对于调节画笔粗细、文字粗细有用,但是目前字体大小的调节与画笔粗细是同步的,有可能你调节好了字体大小,但是你的画笔却会过粗。极为期待该功能可以在后续版本中得以改善。 截图后点击图片边上的一个向上的图标按钮,即可使用其他程序打开截图(此处建议使用你顺手的图片查看器货图片编辑器,我通常选择使用shutter打开)进行浏览或编辑。发现此功能尚不能每次记住之前选择的程序,尚待完善。 四、综合使用方案 简而言之:系统自带截图即插即用,弱项是编辑功能、shutter的强项是文字编辑功能、flameshot的强项是实时编辑功能,弱项是文字编辑功能;每一款都不能尽善尽美,但每一款都有不可取代的强项。所以,我的做法不是在三者中进行取舍,而是将三者结合起来,发挥各自长处、规避缺点、相互补充。尽管这样搭配在某些情况下稍显繁琐,但大部分情况下个人的需求单一、重复操作类似,你完全可根据场景进行调整。 不建议摒弃系统自带截图软件和快捷键、也不建议将默认截屏快捷键改为调用flameshot或shutter 按截图工具设定截图存储路径。我将三个软件的截图内容分别指定了不同的存储路径(其中shutter, flameshot均可直接配置) gnome-screenshot:$HOME/Pictures/Screenshots (如何配置参考前文) shutter:$HOME/Pictures/Shutter flameshot:$HOME/Pictures/Flameshot 配置shutter和flameshot默认开机启动(在软件中可直接配置) 区分应用场景,实时选择: 全屏截取:使用自带截屏工具,按Print一键截屏,省时省力。 截取活动窗口:直接使用自带截屏工具,按Alt + Print 截屏,方便快捷。 自由选区截取:flameshot,为其配置快捷键(F1)、调出flameshot后,只需鼠标选择区域即可。 截取时编辑、保存:flameshot,画线框,对于过多的文字编辑需求,通过shutter提供的编辑工具弥补。 截取后的编辑、图文制作:shutter,本文中的图文制作(尤其文字部分)均在shutter的图片编辑器完成。 截取菜单、弹出窗口等:采用延迟技术截图,先触发截图程序,然后操作弹出菜单,等候延迟到达截取。三款工具均具备延时截屏功能,我用flameshot配置快捷键(F3)来完成。 关于快捷键的说明: 1、系统自带截图功能几个快捷键建议熟记,如要为gnome-screenshot指定自定义保存路径,请参考第一部分; 2、不必为shutter指定快捷键,因为shutter对不同类型的截图区分非常清晰,只需点击一下托盘区图标(参照shutter的介绍),需选择什么便一目了然; 3、为flameshot自定义快捷键,将其作为自由截图的首选工具,其次为其自定义延时截图的快捷键以方便截取菜单。这两个快捷键调用flameshot指令分别为: 如何自定义快捷键,参考此文。 五、后记 做一下总结和对Ubuntu下主流截图软件以后的一点判断: - 除了系统自带的gnome-screenshot,其他两款自由软件虽然存在一些缺陷,但可克服; - 总体而言,结合这三叉戟去完成各种截图任务、并进行一定的图片编辑,基本不在话下; - 期待强大的 Snipaste 能够早日出Linux的版本(MAC版本已有了)。因为用户提了几年了还没动静,依然是 on the way,所以估计还需很长时间,而且不一定会免费。我感觉Snipaste的最终目标是定位在收费用户身上; - 其次,期待flameshot能更加完美,目前该软件开源有60余人维护,可期性更高,而shutter的维护情况不如flameshot,版本更新频率低。 本文所有截图及编辑均由这三款工具搭配完成。如觉得本文有用,请随手点个赞。如有问题,欢迎留言。 六、参考 1. https://help.gnome.org/users/gnome-help/stable/screen-shot-record.html.en 2. https://shutter-project.org/about/ 3. https://flameshot.js.org/#/key-bindings?id=keyboard-shortcuts
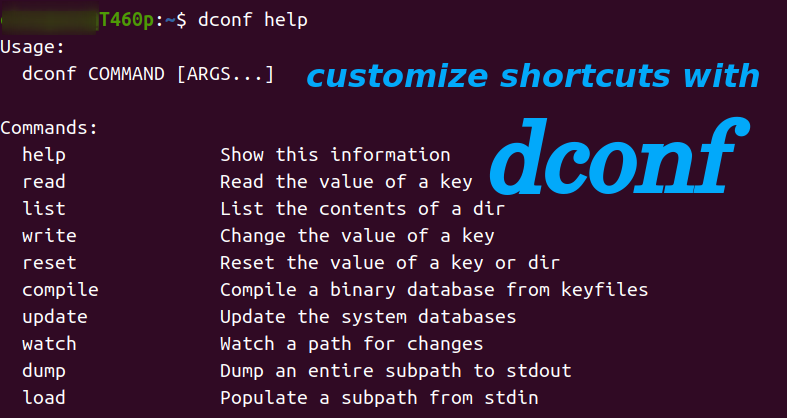
From the previous article, we know it's feasible to add our custom shortcuts via Gnome Control Center or using gsettings commands in script to change key values in dconf database schemas. After knowing more about dconf database configuration system and its cli tool, I figure out another handier way to manage custom shortcuts. All we need to do is to define the shortcuts in two files and then load it by dconf commands. Principles(dconf database and commands) dconf database schema and keys As we kown from the previous article, creating custom shortcuts keybindings is actually related to keys operation in two dconf schemas: 1. in the relocatable schema org.gnome.settings-daemon.plugins.media-keys.custom-keybinding, set three keys(name, command, binding) in the specific custom shortcut sub-folder path; 2. in schema org.gnome.settings-daemon.plugins.media-keys, update key custom-keybindings to generate new sub-folders for created custom shortcuts. With the help of dconf commands, we can read, write schema keys, or we can export(dump) keys to a file, import(load) keys from a file via shell redirection operation. dconf commands basic By knowing the principles, we will introduce how to manage custom shortcuts keybindings via two simple transition files instead of operating keys in dconf schemas directly. This method brings more convenience, we can: - edit multiple keybindings in plain text files - backup and restore shortcut keybindings definitions from files - avoid long path strings when operating relocate schema keys Files needed File 1: custom shortcuts keybindings dconf template This template file contains one custom shortcut: press F1 to call screenshot application flameshot, and it's the first custom shortcut keybinding. We can…
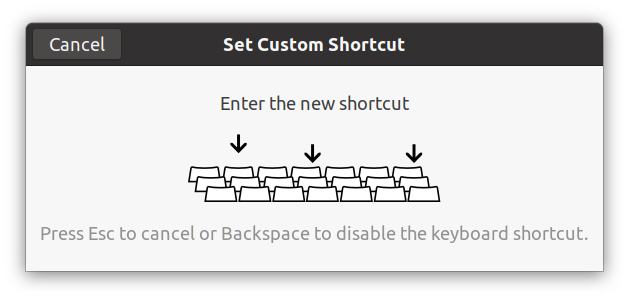
Remider: I found another handier way to manage multiple custom shortcuts after this article was written and I put it here: manage shortcuts keybindings via files and dconf commands. Create new custom key bindings via Gnome Ctronl Cetner Key bindings can be customized using the Gnome Control Center. It can be found as "System Settings" in the menu or accessed on the command line using gnome-control-center. All the key bindings are in the Keyboard Shortcuts section, and the Custom Shortcuts is the last category at the bottom. You can change the default key bindings from other categories, but you cannot remove or disable them here; You can add, remove or modify your own key bindings for applications in Custom Shortcuts category. However, the new custom key bindings cannot override the already defined keybindings in other categories. For example, if you want to set up another shortcut to do screenshot via Print key, that's not applicable here, as this shortcut is aready defined in the Screenshots category and the key is not released. To create your own application keyboard shortcut in the Keyboard Shortcut panel: Click the + button(in previous image). The Add Custom Shortcut window will appear: Type a Name to identify the shortcut, and a Command to run an application. Click the Set Shortcut .... When the Set Custom Shortcut window opens, hold down the desired shortcut key combination. Click Add. Note: The command should work properly in your terminal otherwise your shortcut will not work. So you have to test it before you put it there. Ubuntu Gnome…
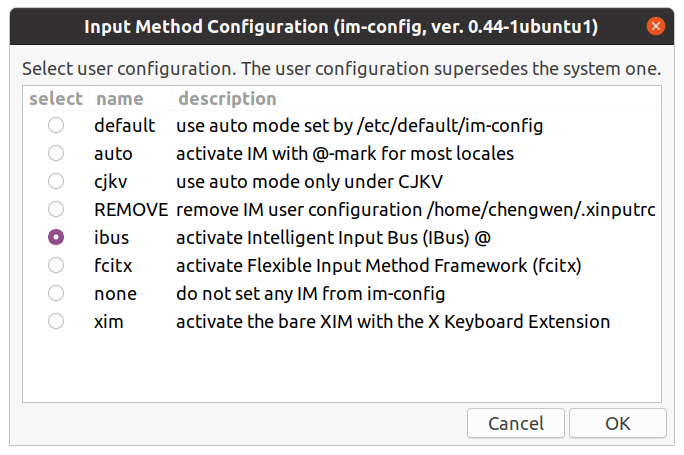
1. 前言 将Ubuntu 18.04 升级至 20.04 的版本之后,发现即使在安装了中文语言包的情况下也无法直接进行中文输入,升级前在18.04中安装的搜狗拼音在新系统中无法使用(很可能与搜狗拼音需要的Qt库有关,而20.04版本已默认不安装Qt库)。我长期以来使用的是 搜狗 的 双拼输入,而搜狗官方的Linux版本 尚未发布支持到20.04的版本(08-25-2020测试,发现已经有适配20.04的版本,见后文)。 经过自己的一些安装使用和体验,发现目前在20.04的系统中较为好用的中文输入方案有四种,下文将介绍安装和配置方法。 2. 准备工作 安装简体中文语言包(如已安装,请忽略) 安装 fcitx(这是由于百度、搜狗、Google拼音均通过fcitx——小企鹅输入法管理工具来配置),如果使用下文方案一可不用安装。 [03-30-2021 更新]: 在Ubuntu Wayland 桌面中使用fictx管理中文输入法 我给Ubuntu启用了Wayland桌面,发现安装的中文输入法不能使用了,在fictx的配置中无法添加进去。而在Gnome或其他桌面环境中不存在此问题。 2种解决办法: 登录时切换桌面,不使用wayland桌面,即可避免该问题; 如果继续使用wayland桌面,需修改配置文件。原因是wayland桌面默认不读取/etc/profile中的环境变量,而是从/etc/environment文件中读取,这是导致fcitx不能正常工作的原因。 sudo vi /etc/environment # Append the following content in this file INPUT_METHOD=fcitx GTK_IM_MODULE=fcitx QT_IM_MODULE=fcitx XMODIFIERS=@im=fcitx sudo reboot # 重启后发现输入法在fcitx中可见了,也能恢复正常使用了 3. 安装配置中文输入法 3.1 方案一:使用ibus添加中文输入法 其实 Ubuntu 20.04 是自带支持中文输入法的,只需稍作配置即可启用中文输入支持。 系统默认已有ibus,以下命令无需执行(因为我删除过) 采用下面命令选择输入法配置工具为ibus(如未配置过其他输入法,也是默认的) 最关键的步骤:在系统“设置”的“语言和区域选项”中添加输入源,通过添加Chinese(汉语)并点击,此时会出现系统自带的几种中文输入法。我选择的是第一个智能拼音方案(支持配置),主要是因为它支持双拼。 重启系统(不建议注销) 3.2 方案二:百度拼音Linux输入法 百度拼音输入法目前基于优麒麟(Ubuntu Kylin)系统进行发布,在优麒麟系统的软件商店中可以直接安装。尽管目前官方版本尚未正式发布支持Ubuntu 20.04的版本,但发现安装现有版本、完全可以正常使用。 官方下载:地址 安装方法: 下载后解压得到安装包文件、基于Deepin Linux和Ubuntu Linux的2份安装说明文档,可以先阅读一下文档。 进入解压缩目录进行安装: 我不想直接安装Qt(下载的包较多较大),所以我忽略了文档中安装步骤的前面5条命令。尽管这样安装会导致“输入法配置面板”无法打开(见文末的图示),但发现完全不影响正常输入的主要功能(输入偏好设置依然可用)。 说明:如参照我的方法调不出百度输入法,请参考官方文档进行安装。 配置方法: 运行命令 im-config 设定默认输入法配置工具为fcitx(参照方案一中图示 )。 运行命令fcitx-config-gtk3 使用fcitx配置工具添加百度输入法:选择左下角的“+”加号,输入 baidu 搜索已安装的 输入法(去掉那个勾),找到后点击添加并使用^移动到第一行(如果使用了多种输入法): 重启系统,发现百度拼音基本上等同(模仿)搜狗输入法,在输入时桌面右上角托盘区会有一只小企鹅图标(表示当前正使用fcitx在管理输入法),右下角有输入法状态条,可用来配置偏好。 3.3 方案三:搜狗拼音优麒麟社区版(企业定制版)(说明:建议使用搜狗官方新版本 08-25-2020) 使用搜狗官方提供的软件包进行安装存在依赖问题,网上也有人采取修复损坏依赖、进行强制安装(我未验证)。而优麒麟官网提供的搜狗输入法,我下载了64位安装包,虽然可以正常安装(会同时安装上搜狗五笔),但无法正常输入。经仔细查证,这两个版本都是在2019年发布的。最终我从Github了解到该输入法的优麒麟系统社区版打包,这是搜狗输入法目前全网最新的Linux修改版,其打包上传到优麒麟的仓库时间是今年4月28日,这个修改定制版是我目前找到的、在Ubuntu 20.04上唯一可正常安装和使用的版本。 说明:采取下面的方法进行安装不会存在依赖问题,且能够正常使用。 添加优麒麟仓库源进行安装 注意:下面install的是sogouimebs包 采用fcitx-config-gtk3搜索sogouimebs将搜狗输入法添加进去,在输入时可看到熟悉的状态条,下图是输入法的属性配置。 在18.04的版本中使用搜狗拼音时,为防止ibus与fcitx相冲突,需执行下述指令移除ibus包。 但是经自己测试:在20.04的版本上下述指令没有必要。 2020-03-302020-08-25 更新搜狗输入法(个人版)** 此文写于数月2个月之前,今天看了一下搜狗输入法官网,发现目前搜狗已经完美适配Ubuntu 20.04,建议采用官方软件包进行安装。下载deb包后,先卸载之前安装的搜狗企业版,然后再安装官网新版本v2.3.2 2.4.0。重新看了下百度Linux输入法,官方的更新依然停留在2020年,也未针对Ubuntu 20+ 以后的版本进行更新。从这一点看来,搜狗拼音在Linux上的开发升级还是非常重视和及时的,这也我多年坚持选择使用它的原因。 最近一次升级是在 2020-11-16,在Ubuntu 21.04 和 21.10出来之后,如果兼容有问题,我判断搜狗应该会继续更新。 新版本也没有我之前使用过程中的一些问题,也可以选择配置皮肤,字体大小等。 3.4 方案四:Google拼音(2020-06-29增加) Google拼音已经发布支持Ubuntu 20.04的版本,所以,我也打算试试它。同样,Google拼音也需要通过fcitx小企业输入法管理器来配置(前文已安装)。 安装: 重启后发现新安装的Google Pinyin已经自动添加到小企鹅输入法管理器之中。 但发现:在Ubuntu中该输入法只能输入全拼或简拼,不能配置支持双拼,默认为中文输入,需按CTRL + SPACE才可切换中英文(不能按Shift键),暂时没找到可配之处。 4. 方案比较(以支持双拼的为主) 由于Google拼音在Ubuntu之下不支持双拼,所以暂时未加入下面列表作比较,如习惯使用全拼、简拼,也可考虑谷歌拼音输入法。 输入法 UI体验 安装配置难度 功能性能 Bug状况 ibus智能拼音 简单,可配置偏好;无皮肤 容易,系统默认支持 输入偶尔有延迟、支持词库 稳定性、兼容性最好 百度拼音 简洁,可配置偏好和皮肤(如安装) 一般,需先安装fcitx 最流畅、支持联想输入、用户词库等 安装皮肤后(不建议安装)输入会出现乱码 搜狗优麒麟企业版 更多可配项:输入偏好、皮肤(没有好看的);高分屏下默认状态条太小(可配) 一般,需先安装fcitx 支持联想输入、用户词库、功能完整 双拼方案尽管可选择采用自然码,但实际上依然是其他方案 5. 结论 尽管以上几种输入法的UI均不如Windows下的版本完整漂亮,但在一个崇尚简洁的Unbutu系统里,它们各有千秋、难分伯仲,均可满足中文输入的需求。从支持双拼的前面几款输入法来看: 如果你追求稳定、易于配置,使用系统自带的输入法即可; 如果你追求流畅,希望输入时更加高效(速度+更准确的智能联想),可选择百度拼音; 如果你追求经典,更多的偏好配置,那么可以继续选择搜狗拼音; 你也可以让百度拼音和搜狗拼音同时安装存在于系统之中,通过fcitx配置好快捷键进行切换。 说明:上图中的最后一个配置项是用来配置百度拼音输入状态条皮肤颜色的,如果在方案二按照上文方式进行安装,将无法启用该配置项(用处极小、完全可不用)。如要启用皮肤,执行: 注意:安装这个皮肤会导致搜狗拼音被删除(两者冲突),并在使用百度拼音时突然出现乱码。因此,不建议安装此状态条皮肤。
Ubuntu 20.04 LTS (Focal Fossa) was officially released on April 23 after two years since the release date of version 18.04. Ubuntu 20.04 features the latest LTS kernel 5.4 and it supports ExFAT file system by default so I can explore files in my Windows system wihtout any barries. It bring many other new features and higher performance as well compared to 18.04. Commands to upgrade from Ubuntu 18.04 $ sudo apt update && sudo atp upgrade -y $ sudo systemctl reboot # Login Loop issue may occur after reboot $ sudo apt dist-upgrade $ sudo apt autoremove $ sudo apt install update-manager-core -y $ sudo do-release-upgrade $ cat /etc/lsb-release DISTRIB_ID=Ubuntu DISTRIB_RELEASE=20.04 DISTRIB_CODENAME=focal DISTRIB_DESCRIPTION="Ubuntu 20.04 LTS" Issues during upgrading process Login Loop Issue: I cannot login system with a valid password after the first reboot: I googled and refered some online solutions like chown username: username .Xauthority, change grub file, etc., these ways cannot fix my issue: I cannot find an .Xauthority file in my home directory (the reason may be my computer is a dual-system) Other issues will occur after trying them The solution is: Press ALT + F3 to switch to another terminal, and excute the upgrade commands once again(without running the reboot command) and continue the upgrading process. The upgrade can be done in this terminal, and the issue will be fixed automatically once Ubuntu 20.04 is installed. It Upgraded to Ubuntu 19.10 at first, not 20.04 directly. I don't actually know the reason, solution: Repeat the upgrade commands to upgrade from 19.10 to the latest 20.04…
Intro My computer is Lenovo T460p, upgraded after I bought in 2017: 480G SSD(Q200 Ex) : replaced the original HHD 24G RAM(8G+16G): increased a 16Gb Samsung RAM It came along with an installed Windows 10 which I updated to version 1903 recently. A course I want to take doesn't support a machine with Windows friendly, it suggests a Ubuntu or Mac. While we strongly recommend using an Apple Macbook for your laptop, we also understand that it's not exactly the most economical option. If you already own a Windows laptop, then you are expected to install and use Linux either alongside (dual boot) or instead of Windows. Ubuntu is our suggested vendor, but Mint is also a fair option. However, I am not willing to install dual-boot systems or replace the already installed Windows 10, as my internal SSD is full of data, it's also not easy to find an economical M.2 2242 type SSD which can be extended on board as a second hard drive. They suggest install Ubuntu on an external drive as an alternative option. It's a economic solution indeed after I found this SSD ( sale price: $99.99 at Best Buy/Amazon on Sept. 12th): Samsung T5 500GB USB External Solid State Drive (MU-PA500B/AM) Preparation A 32 GB USB stick/flash drive (more than 4G is acceptable) Utility: Rufus.exe 3.7 Portable Ubuntu 18.04 Desktop Image Samsung T5 500G SSD with USB cable Steps 1. Create a Ubuntu bootable USB stick Win 10 is both compatible with UEFI and legacy BIOS boot mode. Run command msinfo32 to check boot…