
Scenario and issues If we have internal page data to update, we can implement it by calling component methods to update when the event is triggered, other than to do a whole page re-render. However, we need to call $router.push() method to navigate to a destionation page from another one, and this is my case: I make a component(a button) which is used in different pages to navigate to page A, the component calls $router.push() to jump to page A , Meanwhile, this component is also used iniside page A, that means it's internal route jump to update a part of content in page A; I use the named route with params binding the changed data page A needs in $router.push(). By this way, page A can always get data from the named route and doesn't need to take care of these two different types of navigation. But the issue comes: I cannot do an internal update of page A when the I trigger the component in page A; To watch $route or use beforeRouteUpdate hook to capture changes in page A is not working. The route navigation doesn't trigger these functions, even when the passed params are changed in push(). More details about $route.push() method After trying some ways I fixed this issue and found more details about push() method, which may not be clearly elaborated in the official docs. push() methods returns a promise, so we can catch the error to get reasons when it fails. By adding try catch, I got this: Error: Avoided redundant navigation to…
Use sessionStorage to fix page blank issue of F5 refresh due to vue route push params loss
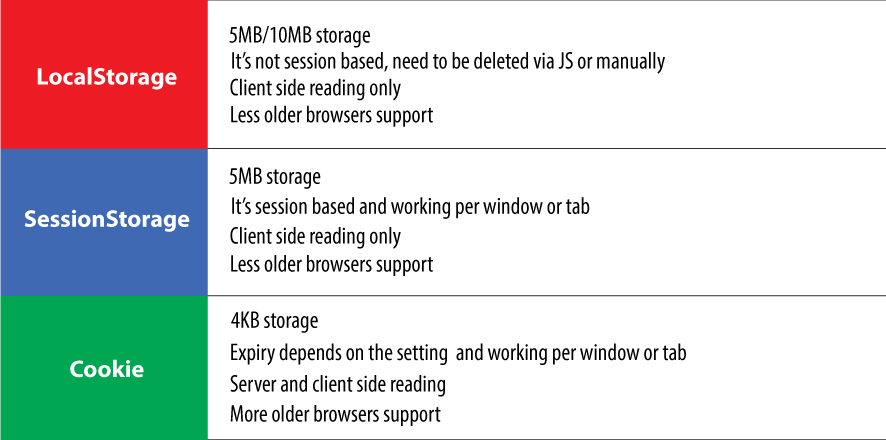
I experienced the issue(mentioned in the article title) when using the push method of Vue router to redirect to a new URL when clicking on some anchors today. Usually, there are two typical ways to go to the new page(route) via using push method: The params passed by the first way(use params)will not be shown in the URL, so if we want to hide more details of the page, it's a better way. However, when I use this way, the web page turns out to be blank when I press F5 to update, as the page cannot get the route parameters which are used as data request params. The route params won't be persistant via this way, they will not exist when page reloads. This is becuase the named route is not pushed into history records, the browser is not able to find a record to reload. Ways to fix To fix this, we can use the second way(use query) to push route params and the parameters will persit even if a F5 update happens. However, the parameters will show up in the URL, and object parameters with several level-depth will turn into long garbled code. I don't want this as I hope to keep the URL address clean. How about the other ways to fix this? I tried to create another state in the Vuex store to keep the data, but this doesn't work as well unless I use the plugin vuex-persistedstate. I checked its github repo and find it uses localStorage, sessionStorage or cookie to persist data. so…

A Router is commonly known as a hardware device for computer networking, we all have wired or wireless routers at home, offices or other locations for devices networking. Router in Web Application We'll get different page content from a site when we change the string after the domain name in a URL, or click the menu items of a webpage. This navigation feature of web apps is done by a Router middleware of the modern web app as well. Accessing to a specific URL path will trigger a respective route response from the web app's routing table, the web app usually uses a specific Router middleware to manage all the routes, no matter whether the routing pages are rendered from server-side or client-side. For example: Backend routing: in Node.js, we can implement routes by express.js, and each endpoint will render the template to html for client-side, each time accessing to a new path(route), there will be a new request sent to the backend. Front-end routing: React.js and Vue.js have their own favorable routing middleware from their ecosystem: react-router and vue-router respectively. The front-end routing is always used for SPA(single page application) website, as it prevents un-neccessary requests to the server, the change of a route accessing will lead to only partial internal view change inside the page, which is usually related to a specific component view of the web app, and whole page rendering is avoided. Understanding Routing mechanism in SPA by Analogy We don't care whether it is called as a path, a uri, or a route when browsing…

I created two websites and deployed them on a free-tier AWS EC2 instance, they have been runing normally since this March; however, it is not available to access today. Updates on 30th Sept.: This happens every two weeks or every month since the first time in this July. Issues I cannot visit my sites from my devices and other peoples', they response is timeout; I cannot connect to the ec2 instance via ssh with my own perm as usual, and it says: ssh: connect to host ec2-54-188-32-115.us-west-2.compute.amazonaws.com port 22: Connection timed out The EC2 IP address is not pingable. Troubleshooting So I opened the EC2 web console and found that my instance is running, but there is a yellow warning sign from the dashboard as only "1/2 checks passed" of the Status Check. The Status Checks failed at the second stage: Instance reachability check failed, and it failed 13 hours ago. The help info suggests a reboot to recover or create a new instance. The latter suggestion is a obviously awful solution as I will lost all the data and configuration. The AWS kownledge center list many reasons or solutions for this issue, and I don't want to read that much before I've tried some easist way. First try: reboot. I reboot it from the console twice, however, the instance cannot be recovered, and the yellow warning still exists. Second try(Fix): Stop and start separately. This is not listed from their suggestion. I certainly don't want to create a new instance. So I stopped the instance from the console, and…

Sass: Syntactically Awesome Style Sheets is the most mature, stable, and powerful professional grade CSS extension language in the world. 1. Steps to use sass in Native html Install sass globally by npm Create separate folders to put .scss and .css files Watch .scss files and compile them to .css real-time Monitor and sync compile single .scss file Monitor and sync compile .scss file to .css in its own directory Or use an extention in VsCode to compile: live-sass-compiler: Compile Sass or Scss to CSS at realtime with live browser reload. easy-sass: Built-in, easy to use Sass compiler Link the .css file in the header of html document: 2. Steps to use sass in React Install node-sass as dependency for React Change file extension .css to .scss Import the .scss files in React component: or read the React official tutorial here 3. Steps to use sass in Vue.js Install npm packages as development dependency: or setup to use them when creating Vue app via vue-cli scaffold tool. You can pick a preset manually and choose a CSS Preprocessor tool while running the vue-cli scalffold. If you choose SASS/SCSS, node-sass and sass-loader will be installed automatically when the project is created. Add lang="scss" in the style tag of the Vue component:
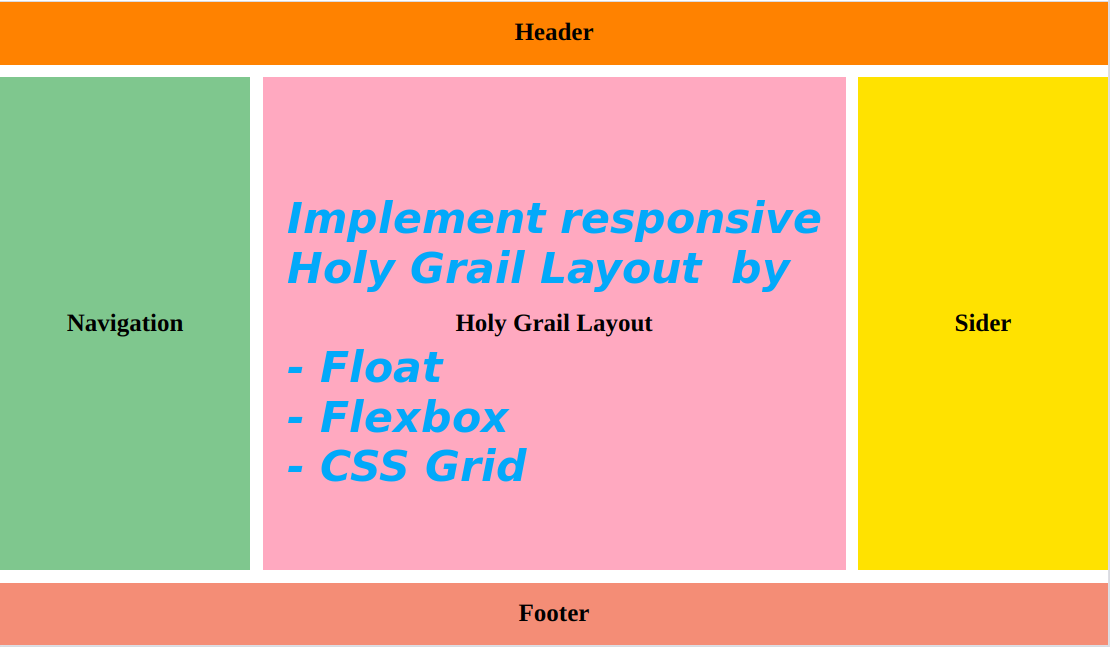
Holy Grail Layout is a classical three-column layout, I will implement it here via three methods: use traditional CSS float property, flexbox and CSS grid separately. The main parts of holy grail layout above should have: height of header and footer: 50px width of two sider columns: 200px responsive height of the three columns, width of the main content Use float property to layout the middle three columns CSS Code Markup Code Use flexbox CSS Code Markup Code: The same with using float Use CSS grid CSS Code Markup Code Comparision float: It is a little complex, and needs to clear the float property from the parent box flexbox: Really flexible, less code, easy to achieve from one dimension - by rows in this case css grid: A two-dimension way to layout, we need to have a good division of the boxes
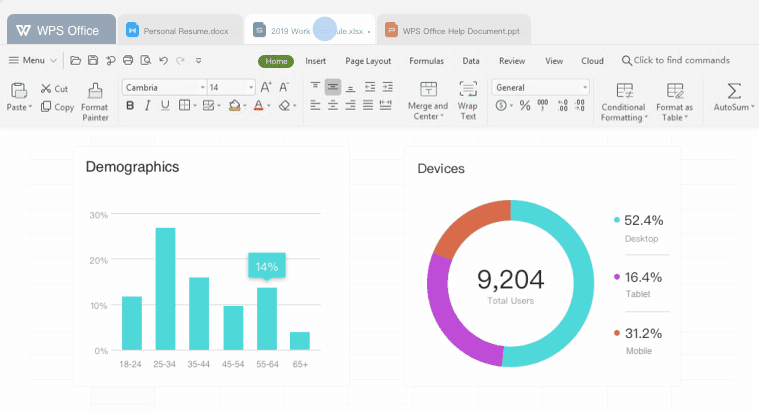
I think WPS office suite is a better option than LibreOffice on Linux OS, especially it is more compatible with MS Office. Uninstall LibreOffice suite Remvoe LibreOffice by apt-get remove in one command line instead of apt remove, as the latter doesn't support wildcard. Remove installation packages no longer needed Install WPS 2019 from official website Go to WPS website, click and download the *.deb package. The package version is 11.1.0.9522 and released on 2020.06.08. Go to the download folder and install, then delete the installation package. To launch the WPS writer, just type: You will see a very clean application, however it has no internet connection for online service. Install WPS 2019 by snap package Alternatively, you can install the snap package because WPS has already launched in Ubuntu Software Center. Search wps and find to install, or install it with the following commands. Update repositories and look up available packages There are several versions in the list, and wps-2019-snap is the latest one, while wps-office-multilang is actually WPS 2016 which is not recommended right now. Install the latest version 11.2.0.9505 (which is not as updated as the package from official site). Suggestion I suggest download WPS from official website and install it from your local drive. It's more fast than installing from the snap archive servers, and you will get a more updated version as well.
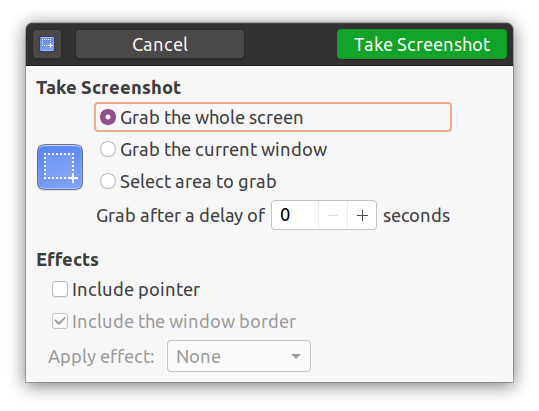
一、前言 本文不对每款软件的具体使用做详细介绍,如不熟悉可以自行操作几次即可(欢迎留言)。 本文倾向于介绍主要截图软件的选择(差异和优缺点)、核心用法、遇到问题的解决办法、不足之处的弥补、以及大家平时可能没有留意到的一些技巧。以便大家根据具体的应用场景,让你的截图需求能得以尽可能满足。 本文的目的是让你在 Ubuntu 20.04 下选择和使用截图软件时,完全不需再去寻找其他软件和遇到问题的解决办法,而通过看这一篇文章即可全部搞定。篇幅偏长、文字较多,建议耐心翻阅。 二、几个问题 是否有Windows的Snipaste这样的截图神器? 答案是目前还没有,但有类似软件flameshot。 flameshot可以出色的完成Snipaste的功能吗? 答案是基本可以,但部分功能尚不完美。 那怎么弥补? 请看下文 三、Ubuntu截图三叉戟介绍 gnome-screenshot与生俱来,另两款(flamehsot和shutter)功能强大、各有千秋,有了他们仨,真的没必要再去寻找其他替代方案了。 1. gnome-screenshot GNOME桌面系统中原生截图工具,系统中默认的几个截图快捷键(可修改,但不可直接删除)均是调用的是该程序。 自述:其实我也是带UI的,只是一般情况用快捷键执行我的功能就好了。想看我的容貌? 截图默认保存路径:用户根目录/Pictures 建议记住如下六个快捷键(尤其前几个): 快捷键 功能描述 Print 全屏截取并保存 Shift + Print 选区截取并保存 Alt + Print 截取当前活动窗口并保存 Ctrl + Print 拷贝全内容至剪切板(不保存文件) Ctrl + Shift + Print 拷贝选区内容至剪切板(不保存文件) Ctrl + Alt + Print 拷贝当前活动窗口至剪切板(不保存文件) 优点:原生自带、随手可用 缺点: 不带图片编辑功能 选区截图需 Shift 和 Print 两个同时按住、另需鼠标划定范围,因此必须双手操作。由于选择区域时通常较为仔细、操作时间更久,导致按住两个键的一手负担偏重 主要问题及解决办法:因为系统默认保存路径这个目录自动关联了很多其他程序与图片相关的操作,导致保存的图片来源众多、不便区分查找。如何将截图文件保存到自定义的目录?默认保存路径在系统中只能通过修改dconf数据库中的键值(通过dconf editor)修改,但即使修改了、在使用快捷键截图时却依然不生效。这是GNOME中一个多年未解决的缺陷,在采用Gnome 3.8.x以后版本的桌面系统中怎么修改都不会生效,除非不用系统默认快捷键。这个问题提出已有7年时间,但官方尚未决定去修正(我估计是因为可以通过别的方法即可达到该目的)。解决思路是:在修改了保存路径之后,禁用系统已定义的快捷键(或直接定义其他不同的快捷键调用gnome-screenshot来截图)、然后重新自定义相同的键映射。为了让截图底快捷键与上表中的保持一致,我使用如下方法来解决该问题(限于篇幅,不再介绍如何使用dconf editor等工具来修改): 第一步:创建目标目录,并修改gnome-screenshot的保存路径至该目录 第二步:禁用系统截屏快捷键(以上表中的6个键为例) 第三步:调用gnome-screenshot命令重新映射这6个系统截屏快捷键(这一步建议在Gnome Control Center中手动配置,各快捷键分别调用的命令如下): 想了解如何自定义快捷键,请阅读该文,如想批量修改自定义快捷键,请阅读该文。 2. shutter 功能完善、自带图片编辑器。我在 Ubuntu 18.04 版本中的截图和编辑工作基本上由它完成。 安装:Ubuntu 20.04 官方源提供的 snap 版本可以安装,但运行时存在缺陷,发现如下问题: Error while opening directory /home/username/Pictures There was an error determining the filename ... 截取窗口时程序崩溃却未退出,因此再次启动程序导致部分功能依然不能使用,需先杀死进程 解决办法:不要使用官方snap包(软件中心)进行安装,添加下面的PPA源安装(定制修正版)即可(此版本暂不能截取网页,但其他功能稳定) 优点: 提供了单独的图片编辑器,可在截图后对图片进行编辑,便于后期制作图文教程(例如针对描述操作步骤,该版本提供了自增的文字序号,非常方便) 可用鼠标自由截取选区 可截取当前活动的窗口、非活动窗口、菜单和提示框等 系统托盘区图标弹出菜单分类清晰,非常便于按需截取(因此没必要去定义快捷键) 缺点: 不能在截取时直接编辑(这也算不上缺点,这是相对于flameshot或snipaste来说的,但也是设计理念的差异) 截取窗口时有小部分的边框背景出现(若该窗口非全屏或背景有其他颜色,导致截图看起来不完美) 技巧: 在打开了截图文件后,可用Shutter的编辑器进行图片编辑。快捷键:Ctrl + E 3. flameshot 最接近 Windows 下的 Snipaste 的软件,一看截图界面你就会喜欢它的。 安装: 优点: 在截取时即可进行图片编辑(与snipaste类似),节省操作时间。对于做演示建议多使用它。 可用鼠标自由截取选区 缺点: 不能在截取时直接编辑(这也算不上缺点,这是相对于flameshot或snipaste来说的,但也是设计理念的差异) 不可直接截取活动窗口 编辑功能有待加强(相对于Snipaste): 插入文字默认字体太小(文字输入字体太小,虽然可以调节,但文字调大后,画图工具的笔刷又太粗) 已编辑对象不可再次编辑(可取消,但不可移动调节大小,修改文字内容等) 技巧: 配置支持在图片上添加文本(可能是因为这块功能尚不完善,所以默认未启用) 配置支持截图附着在桌面上(默认未启用,做演示时非常有用) 为区域选择和延迟截屏定义快捷键(参照下面的第四部分) 在画图和添加文字时为画笔或文字选择不同的颜色,快捷键:右键 调出下图中间圆形区域,提供10种可选颜色: 编辑时打开侧边栏画板用来调节画笔粗细、文字大小、编辑历史。快捷键:空格 将在屏幕左侧打开侧边栏,可以调节编辑颜色、画笔文字粗细,查看编辑历史。虽然该功能对于调节画笔粗细、文字粗细有用,但是目前字体大小的调节与画笔粗细是同步的,有可能你调节好了字体大小,但是你的画笔却会过粗。极为期待该功能可以在后续版本中得以改善。 截图后点击图片边上的一个向上的图标按钮,即可使用其他程序打开截图(此处建议使用你顺手的图片查看器货图片编辑器,我通常选择使用shutter打开)进行浏览或编辑。发现此功能尚不能每次记住之前选择的程序,尚待完善。 四、综合使用方案 简而言之:系统自带截图即插即用,弱项是编辑功能、shutter的强项是文字编辑功能、flameshot的强项是实时编辑功能,弱项是文字编辑功能;每一款都不能尽善尽美,但每一款都有不可取代的强项。所以,我的做法不是在三者中进行取舍,而是将三者结合起来,发挥各自长处、规避缺点、相互补充。尽管这样搭配在某些情况下稍显繁琐,但大部分情况下个人的需求单一、重复操作类似,你完全可根据场景进行调整。 不建议摒弃系统自带截图软件和快捷键、也不建议将默认截屏快捷键改为调用flameshot或shutter 按截图工具设定截图存储路径。我将三个软件的截图内容分别指定了不同的存储路径(其中shutter, flameshot均可直接配置) gnome-screenshot:$HOME/Pictures/Screenshots (如何配置参考前文) shutter:$HOME/Pictures/Shutter flameshot:$HOME/Pictures/Flameshot 配置shutter和flameshot默认开机启动(在软件中可直接配置) 区分应用场景,实时选择: 全屏截取:使用自带截屏工具,按Print一键截屏,省时省力。 截取活动窗口:直接使用自带截屏工具,按Alt + Print 截屏,方便快捷。 自由选区截取:flameshot,为其配置快捷键(F1)、调出flameshot后,只需鼠标选择区域即可。 截取时编辑、保存:flameshot,画线框,对于过多的文字编辑需求,通过shutter提供的编辑工具弥补。 截取后的编辑、图文制作:shutter,本文中的图文制作(尤其文字部分)均在shutter的图片编辑器完成。 截取菜单、弹出窗口等:采用延迟技术截图,先触发截图程序,然后操作弹出菜单,等候延迟到达截取。三款工具均具备延时截屏功能,我用flameshot配置快捷键(F3)来完成。 关于快捷键的说明: 1、系统自带截图功能几个快捷键建议熟记,如要为gnome-screenshot指定自定义保存路径,请参考第一部分; 2、不必为shutter指定快捷键,因为shutter对不同类型的截图区分非常清晰,只需点击一下托盘区图标(参照shutter的介绍),需选择什么便一目了然; 3、为flameshot自定义快捷键,将其作为自由截图的首选工具,其次为其自定义延时截图的快捷键以方便截取菜单。这两个快捷键调用flameshot指令分别为: 如何自定义快捷键,参考此文。 五、后记 做一下总结和对Ubuntu下主流截图软件以后的一点判断: - 除了系统自带的gnome-screenshot,其他两款自由软件虽然存在一些缺陷,但可克服; - 总体而言,结合这三叉戟去完成各种截图任务、并进行一定的图片编辑,基本不在话下; - 期待强大的 Snipaste 能够早日出Linux的版本(MAC版本已有了)。因为用户提了几年了还没动静,依然是 on the way,所以估计还需很长时间,而且不一定会免费。我感觉Snipaste的最终目标是定位在收费用户身上; - 其次,期待flameshot能更加完美,目前该软件开源有60余人维护,可期性更高,而shutter的维护情况不如flameshot,版本更新频率低。 本文所有截图及编辑均由这三款工具搭配完成。如觉得本文有用,请随手点个赞。如有问题,欢迎留言。 六、参考 1. https://help.gnome.org/users/gnome-help/stable/screen-shot-record.html.en 2. https://shutter-project.org/about/ 3. https://flameshot.js.org/#/key-bindings?id=keyboard-shortcuts
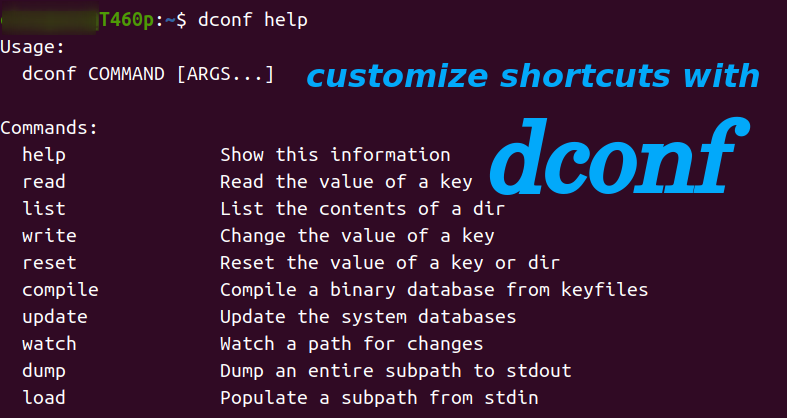
From the previous article, we know it's feasible to add our custom shortcuts via Gnome Control Center or using gsettings commands in script to change key values in dconf database schemas. After knowing more about dconf database configuration system and its cli tool, I figure out another handier way to manage custom shortcuts. All we need to do is to define the shortcuts in two files and then load it by dconf commands. Principles(dconf database and commands) dconf database schema and keys As we kown from the previous article, creating custom shortcuts keybindings is actually related to keys operation in two dconf schemas: 1. in the relocatable schema org.gnome.settings-daemon.plugins.media-keys.custom-keybinding, set three keys(name, command, binding) in the specific custom shortcut sub-folder path; 2. in schema org.gnome.settings-daemon.plugins.media-keys, update key custom-keybindings to generate new sub-folders for created custom shortcuts. With the help of dconf commands, we can read, write schema keys, or we can export(dump) keys to a file, import(load) keys from a file via shell redirection operation. dconf commands basic By knowing the principles, we will introduce how to manage custom shortcuts keybindings via two simple transition files instead of operating keys in dconf schemas directly. This method brings more convenience, we can: - edit multiple keybindings in plain text files - backup and restore shortcut keybindings definitions from files - avoid long path strings when operating relocate schema keys Files needed File 1: custom shortcuts keybindings dconf template This template file contains one custom shortcut: press F1 to call screenshot application flameshot, and it's the first custom shortcut keybinding. We can…
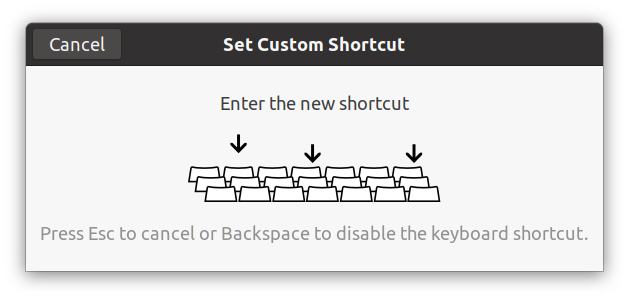
Remider: I found another handier way to manage multiple custom shortcuts after this article was written and I put it here: manage shortcuts keybindings via files and dconf commands. Create new custom key bindings via Gnome Ctronl Cetner Key bindings can be customized using the Gnome Control Center. It can be found as "System Settings" in the menu or accessed on the command line using gnome-control-center. All the key bindings are in the Keyboard Shortcuts section, and the Custom Shortcuts is the last category at the bottom. You can change the default key bindings from other categories, but you cannot remove or disable them here; You can add, remove or modify your own key bindings for applications in Custom Shortcuts category. However, the new custom key bindings cannot override the already defined keybindings in other categories. For example, if you want to set up another shortcut to do screenshot via Print key, that's not applicable here, as this shortcut is aready defined in the Screenshots category and the key is not released. To create your own application keyboard shortcut in the Keyboard Shortcut panel: Click the + button(in previous image). The Add Custom Shortcut window will appear: Type a Name to identify the shortcut, and a Command to run an application. Click the Set Shortcut .... When the Set Custom Shortcut window opens, hold down the desired shortcut key combination. Click Add. Note: The command should work properly in your terminal otherwise your shortcut will not work. So you have to test it before you put it there. Ubuntu Gnome…